Thursday, June 27, 2013

Weekly Wishlist: Wooden Accessories on Etsy

1. Repeating Diamond Necklace: Bird of Virtue/Etsy; 2. Wood LP Case: Steidle Woodworking Company/Etsy; 3. Wood and Cork Glasses: Vision Wood Eyewear/Etsy; 4. Feminist Wooden Heart Brooch: Kate Rowland/Etsy; 5. Wood on Wood Clutch: RWOODB/Etsy.

We've been having a rainy, rainy week here in Seattle, and it's been making every plant I see look the most beautiful brilliant green. That, of course, is making want to run to the woods. But alas, I am a city girl with no car, and thus I shall lust over wooden accessories instead!

I'm hoping to volunteer at Urban Craft Uprising in a few weeks, and while I was looking through the vendors who will be at this summer's show I fell completely in love with Bird of Virtue's gorgeous wooden jewelry. I love this piece in particular with it's semi-honeycomb design and pretty metallic colors.

In other jewelry news, I'm totally obsessed with EVERYTHING in the Kate Rowland shop on Etsy. She makes adorably wooden jewelry that's inspired by all sorts of things near and dear to my heart. I love this feminist brooch and would be thrilled to wear it around like a heart on my sleeve. 

These sunglasses by Vision Wood Eyewear are amazingly beautiful and completely hand made. They're one of those amazing products that will likely remain on my wishlist because, ya know, I wish I had enough money to buy them...

Can we talk about this amazing wood clutch by RWOODB for a minute? How do you make a clutch out of wood??? I have no idea, but I'm so glad RWOODB figured it out because it's stunning.

Last but not least, I'm head over heels in love with this wood LP case from Steidle Woodworking Company. The most nostalgic part of me pictures packing up some of my favorite LPs on a rainy day and heading to a friend's house for a day of lying on the floor listening records, drinking tea, and talking.

What are you guys wishing for this week?

Til next time!

-Becca

Follow on Bloglovin

Wednesday, June 26, 2013

DIY Tags for Mason Jars!

Alright guys, this post is going to start off with a lot of qualifiers. Here we go!

If you're like me and you like canning, and you like giving your delicious canned goods as gifts, you may find yourself looking for a cute easy way to jazz up your jars! So how about trying these super cute tags for mason jars? It's a fun way to bring a little life to them and make them a little giftier.

And hey, even if you don't can, you can always use this basic concept to make cute tags for any old thing! 

Here's what you'll need to make them:
Supplies:
  • Tags appropriately sized for your jars and stamp.
  • A jar shaped stamp like this one.
  • Stamp ink, which is not pictured because some dummy, I can't even begin to know who *ahem*, forgot to put it in the picture.
  • A pen that matches your ink. If you're not into matching, totally feel free to use different colors.
  • Washi tape in a pattern and color of your choosing.
  • Scissors
  • Baker's twine. If you have string already lying around you should totally make your own baker's twine using this tutorial over on Radical Possibility!
Step One! 

Apply your washi tape to the edges of your tag. I recommend doing the long sides first, then the short sides, then the diagonals. Be sure to trim off the excess at the ends every time you apply the tape to one of the sides so you can keep everything nice and neat.

Also, be sure to leave plenty of clearance for your stamp! When I placed my tape I would say I set it up so 1/3 of the width was on the front of the tag and the other 2/3 of the width got folded to the back side of the tag.
Step Two!

Press your stamp into your ink and then press your stamp onto the tag.

To help with placement, I usually put the stamp on its end and try to center the design, then rock it down onto the tag. I'm really not great at telling where the stamp is centered on the block so I find this method incredibly helpful!
Step Three!

Write on your tag! I did my best attempt at fancy lettering and wrote the contents of the jar in the jar stamped on the tag (woah.), which in this case was Sour Cherry Preserves. I also always put the best by date on the bottom of the tag so the recipient knows when to use the contents by.
Step four!

Attach your tags to your jars using the baker's twine, tie a bow and call it a day!

I hope you enjoyed this quick tutorial and hope you will now go forth and make adorable tags for every canning and gifting occasion.

Til next time!

-Becca

P.S. I am clearly a fan of the good old exclamation point. Ya'll would be shocked to see how many are in a post before I edit! Oof.

Tuesday, June 25, 2013

Lemon Meringue Pie


Hi everyone! Today I'm going to share a recipe for one of my favorite desserts, Lemon Meringue Pie! In fact, I might even go so far as to say that Lemon Meringue is my favorite kind of pie. Yes indeedy, my heart just pitter patters over the combination of graham cracker crust, tart lemon filling, and pillows of fluffy, sweet, lightly caramelized meringue. So good.
To get started, you'll need a crust. Graham cracker crust to be exact. Here's how to make it:

Graham Cracker Crust- Makes 1 pie shell

Ingredients:

  • 1 1/2c crushed graham crackers (I used gluten free, as usual).
  • 3 tbsp sugar
  • 2 tbsp melted butter
1. Preheat your oven to 325°F
2. In a food processor, process the graham crackers and sugar until fine.
3. Pour the butter over the crumbs, and pulse a few times until just combined.
4. Pour the graham cracker mixture out into a pie pan. Non-stick makes life a little easier when you're serving, but any old pan should work just fine.
5. Press the crumbs into the pan forming a crust. My super special trick for doing this without making myself crazy is to use a measuring cup to press the crumbs up the sides of the pan. I find it's approximately 90% more effective than using my fingers. While you're at it, use it to press the crumbs into the bottom of the pan, too!
6. Bake the crust for 5-10 minutes until fragrant, then remove from the oven and cool.

Now that we've got our crust, we can move on to the pie itself, glorious Lemon Meringue Pie!

Lemon Meringue Pie

Ingredients:

  • 1 prepared graham cracker crust (see above!)
  • For Filling:
    • 1 c sugar
    • 5 tbsp cornstarch
    • 1 c water
    • 1/2 c milk
    • 4 large egg yolks
    • 1 tbsp butter
    • 1/2 c fresh lemon juice
    • 2 tsp freshly grated lemon zest (do your zesting first and your juicing second! I forget all the time, but zesting first makes life ten times easier, promise.)
  • For Meringue:
    • 4 large egg whites (ah, how convenient, we just separated the egg yolks from 4 eggs for the filling!)
    • 1/4 tsp cream of tartar
    • Pinch of salt
    • 1/2 c sugar
1. Prepare your pie crust and let it cool, then preheat the oven the 350°F
2. In a heavy sauce pan, whisk together the cornstarch and sugar, then add the milk and water, and whisk until combined. In a separate bowl, whisk together your egg yolks. Whisk whisk whisk!
3. Cook the milk mixture over medium heat whisking constantly until it comes to a boil.
4. Pour approximately 1 cup of the milk mixture into the egg yolks, whisking the yolks constantly while you do this. This process tempers the eggs so you don't end up with little bits of cooked egg throughout your filling. Gross.
5. Return the yolk mixture to the milk mixture, and simmer the mixture, whisking constantly for 3 minutes.
6. Remove from heat, add lemon juice, lemon zest, and butter and whisk to combine. Once this is well combined, cover the filling (the filling, not the pan!)with saran wrap, and set aside.
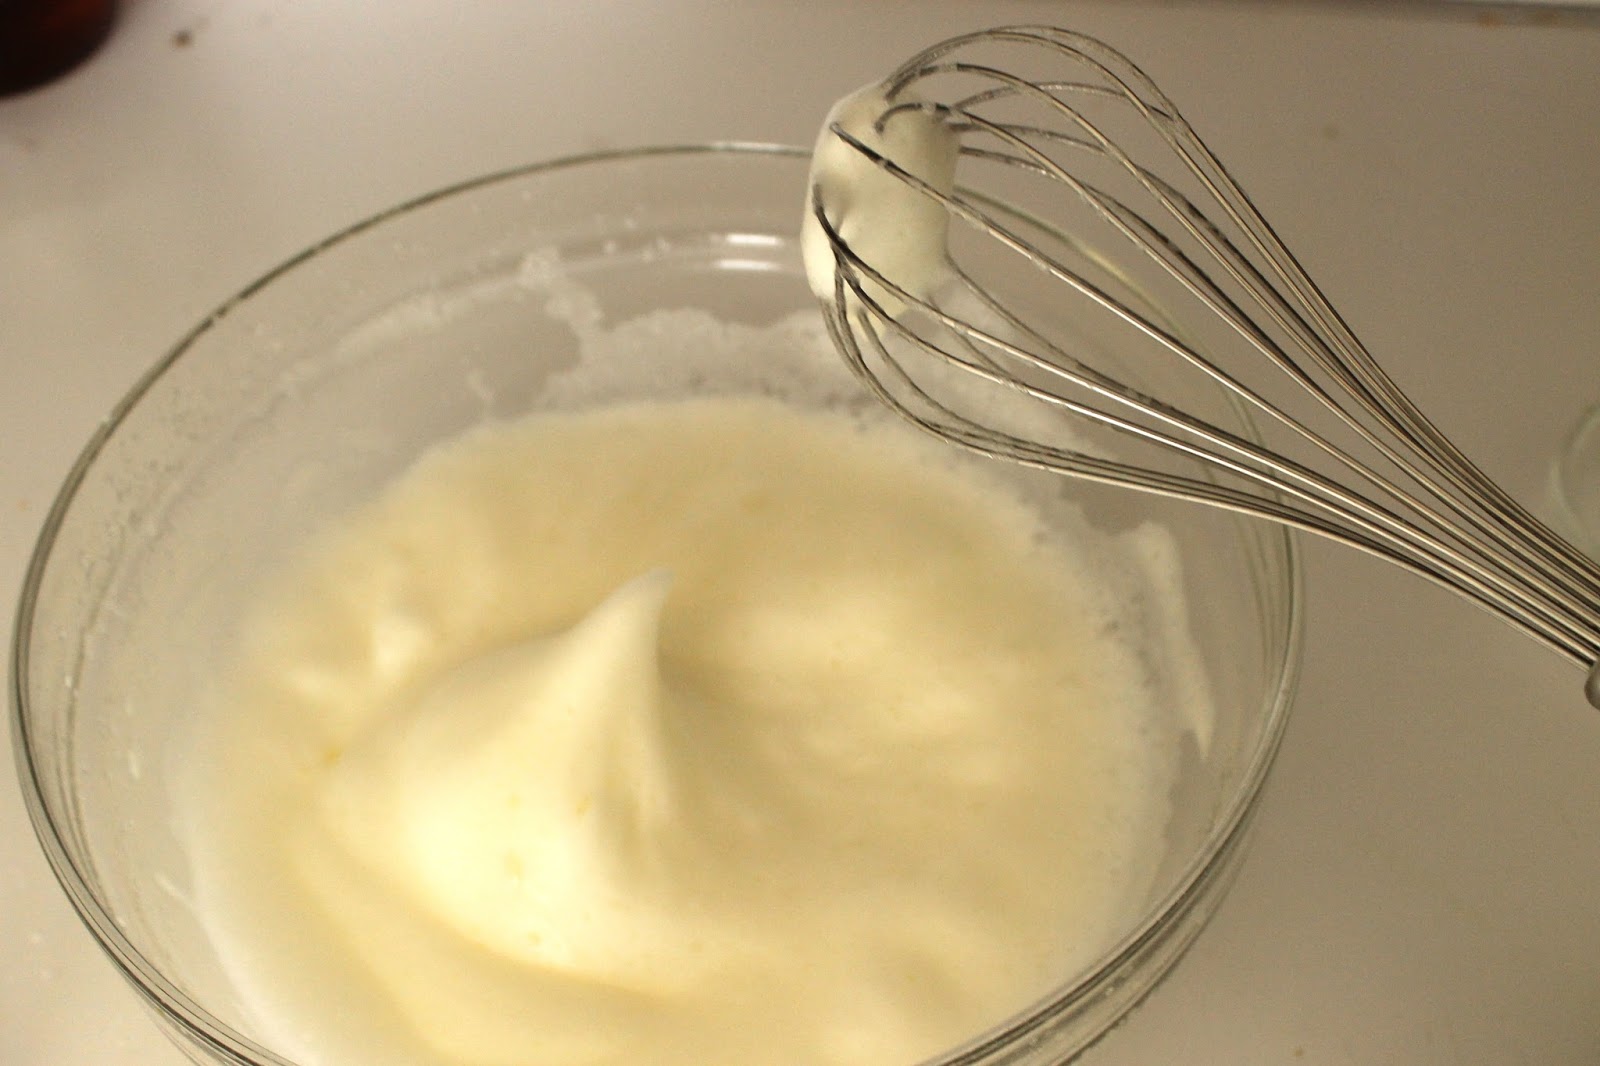
7. In a large mixing bowl, combine the egg whites, salt, and cream of tartar, then beat using an electric mixer (or by hand if you're a masochist), until the egg whites hold soft peaks.
8. Slowly stream in the sugar while beating the egg whites, and continue beating until the egg whites hold stiff peaks.
Components complete! It's assembly time!
9. Remove the saran wrap and pour the lemon filling into your pie shell. Make sure to spread it evenly in the shell.
10. Next you're going to pile your meringue on top of the lemon filling and spread that shit out. You'll want to be sure to have the meringue meet the edges of the pie shell. Then once it's evenly spread, make it pretty! If you were extra fancy, you could totally pipe the meringue on top.
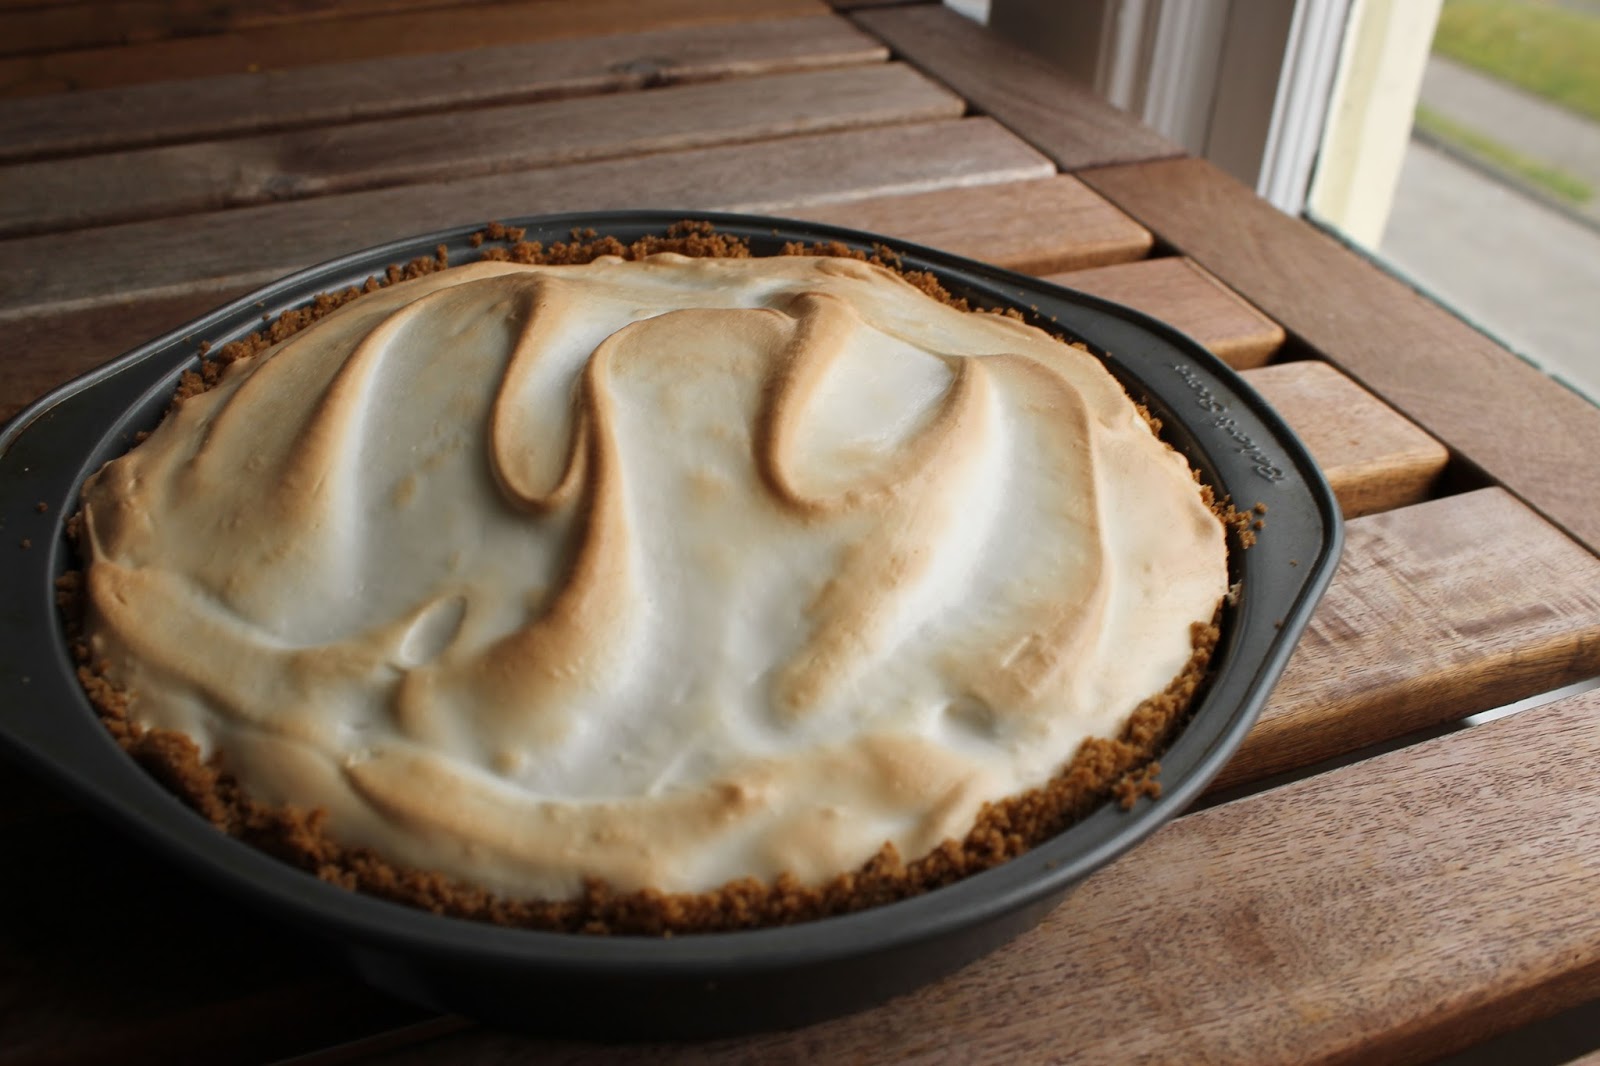
11. It's baking time! Bake that pretty pie in the oven for 15 minutes, or until the meringue is golden. Once it's done, remove it from the oven and let it cool. After it's cooled be sure to refrigerate it because, ya know, eggs.
As you can see, Lemon Meringue Pie is clearly the dreamboat of the pie world. Let's take a closer look:
Ah yes, crunchy graham cracker crust, tart gooey lemon filling, and sweet meringue so fluffy you kind of want to take a nap on it.

I hope you love it as much as I do!

Til next time!

-Becca

Monday, June 24, 2013

Weekend Wardrobe: Gingham in the Park

Dress: Vintage/Etsy; Belt: Anthropologie/Similar; Shoes: Swedish Hasbeens; Hair pins: DIY.

This weekend I had a lovely outing with Katie, of Katie Marie V, that included some shopping for stamping supplies (more on that later this week!), eating ice cream, getting interviewed and photographed for an online magazine (!!!), frolicking through a beautiful park in Wallingford, and having a photo shoot, obvs.

Since it was such a lovely warm day, I was really in the mood to wear some vintage (which seems to be the trend lately...), so I wore one of my favorite dresses, this vintage brown gingham number. Now, by some miracle of the internet, you too could own this dress! Seriously, check out this Etsy listing for THE EXACT SAME DRESS! Sometimes the world is super cool.

Til next time!

-Becca

Saturday, June 22, 2013

DIY Button Bobby Pins

Hey guys! I know this week I promised a DIY on how to make a peter pan collar, but oh boy is that ever not happening.

Once I sat down to go over the photos and write up my post, I realized that while I was working on the project, I ended up changing my mind 50 million times so it was basically the most confusing DIY of all time.

So instead, how about some DIY button bobby pins? They're super cute and couldn't be easier!
As usual, let's start things off with supplies! You'll need bobby pins, buttons, matching embroidery floss, and a thinnish embroidery needle. Aka, all of my cats' favorite toys. Good god they would not leave me along during this project.
1. Begin by threading your needle with embroidery floss, bring the ends together and tie a knot.

2. Put the needle through the opening at the bent end of the bobby pin, then between the embroidery floss and pull tight to secure the thread to the bobby pin. To further secure it, also make a knot around the top prong of the bobby pin.

3. Put the needle through one of the holes on the bottom side of the button, then pull it through and put it down through the other hole on the top side of the button and pull through. Repeat this three times, being sure to put the needle through the opening on the bent end of the bobby pin before you do the next round.
4. After you've done step 3, well, 3 times, insert your needle through the stitching on the underside of the button, then pull it all the way through and cut the embroidery floss as close to the stitching as you can.
That's it! There are only 4 steps! Now all you have to do is put 'em in your hair and wear those cuties!

Til next time!

-Becca

Thursday, June 20, 2013

Weekly Wishlist: Kitchen Edition!

1. Tin Ceiling Tiles: Home Depot; 2. Stanley Thermos Flask: West Elm; 3. Ceramic Ice Cream Cone: Anthropologie; 4. Mini Ceramic Bowls: Anthropologie; 5. End Grain Cutting Board: Crate and Barrel; 6. New York Times Crossword Container: ModCloth

Well guys, this week I've got my kitchen on my mind. The space I live in has a nice bright and airy kitchen, so I love adding things that play that up.

I love the idea of adding wallpaper to my kitchen, but since I love how bright it is I would be interested in adding texture and pattern more than color. I've been obsessed with tin ceilings for years and think it would be lovely to use the tiles as panelling on the walls. Especially when it's a super cute pattern like this one.

Admittedly, I'm not a big drinker, but I love this flask so much I'd consider getting it just to carry around good maple syrup or something in case any emergency breakfast situations arose!

Also? Ceramic ice cream cone? Be still my gluten free heart! Sometimes you just don't want to have to use a spoon when you eat ice cream, am I right?

This set of ceramic bowls would make prep work in the kitchen breezy and beautiful. I used to always think it was crazy to pre-measure everything into little bowls like they do on cooking shows (so many extra dishes!), but once I started cooking more and making things like curry and pickles, I realized exactly how much time, energy, and stress it saved.

I've been using crummy IKEA cutting boards for ages, and they work just fine, but now that I'm doing more food photography I'd love to have a beautiful wood piece like this to work with.

Last, but not least, this adorable New York Times crossword puzzle jar. I can just picture myself doing a crossword at the kitchen table and drinking tea lightly sweetened with some sugar from my crossword puzzle jar! So fun!

What are you wishing for this week?

Til next time!

-Becca

Wednesday, June 19, 2013

Neighborhood Snapshots

The last few days in Seattle have been gorgeous! The other day, I decided to go for a walk after work and take some snapshots of my neighborhood! It's really beautiful this time of year. There are flowers everywhere, lots of bright greenery, pretty old buildings, and blue skies as far as the eye can see.

Summer is officially here on Friday. Soon there will be cherry trees to pick, swimming in Lake Washington, long days canning summer fruit in a blisteringly hot kitchen, and afternoon naps in the park. I can't wait.

Til next time!

-Becca