Showing posts with label DIY. Show all posts

Thursday, June 5, 2014

Milkmaid Briads Tutorial


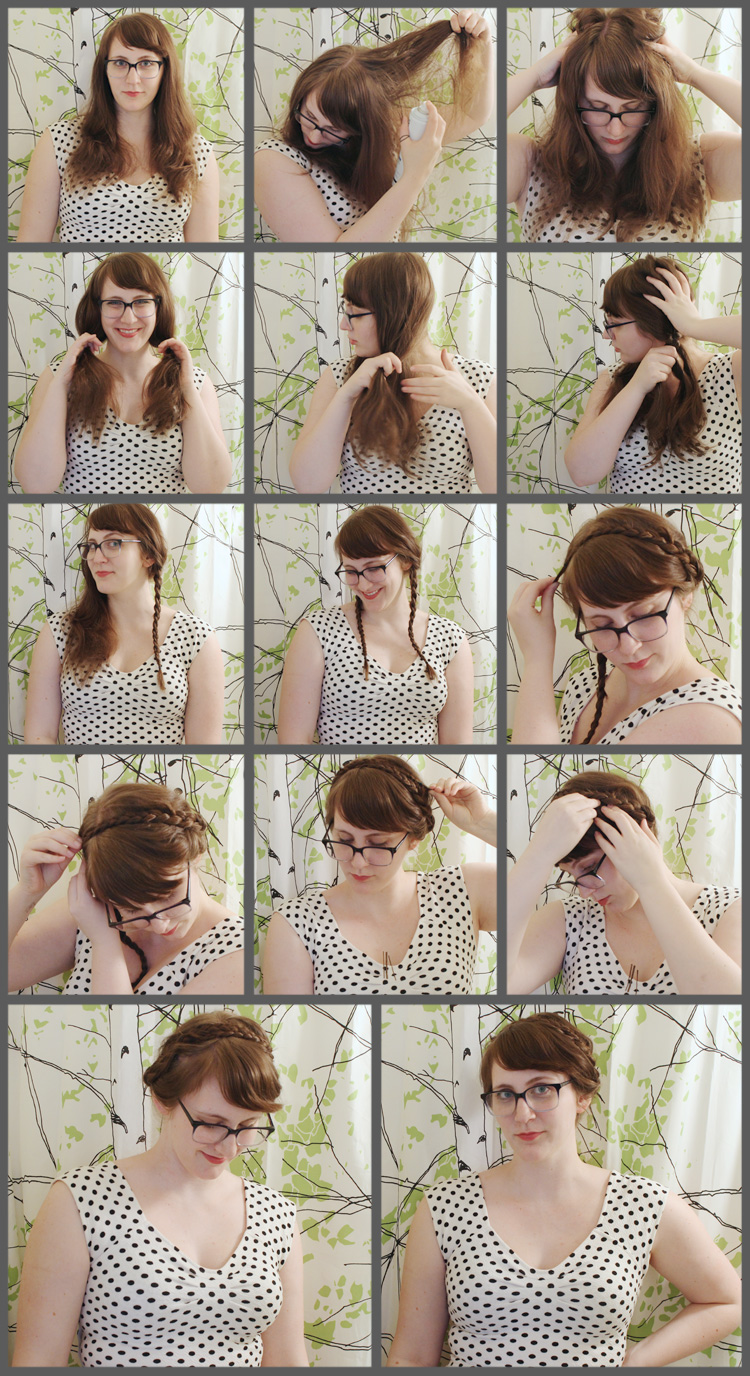
As I'm sure you've noticed by now, I wear my hair up a lot. Lately, one of my favorite hairstyles is up in milkmaid braids. Since some of you have been asking how to do it, I figured I'd do a quick tutorial for you guys!

The best thing about this hairstyle is that it's super easy and only takes about 5 minutes to do. If you can do a simple braid, you can make this happen. Promise!

Take a look at the photos and follow along!

1. Brush your hair! Mine's always real tangly, so this is key.
2. If you've got hair that's prone to laying flat like I do, spray a little hairspray on your roots and scrunch it up to give your hair a bit of volume.
3. Divide your hair into two sections by parting it down the back of your head.
4. Begin braiding one side. Once you get a bit of a braid started (like, maybe 2" or so), hold it in place and scrunch your hair up a bit by your roots. Again, volume!
5. Finish your braid, and secure it with a small hair tie. I like using the tiny little elastic ones, since they're not bulky.
6. Repeat steps 4-5 on the other side.
7. Grab the end of one of your braids and bring it up over your head like a headband. Once you've positioned it to your liking, use a bobby pin to pin it in place. I find that the best spot for this is just above the hair tie since the bulk of the hair tie holds the braid in place very nicely.
8. Repeat step 7, tucking the end of your braid and the bobby pin under the other braid.
9. Use bobby pins to secure and loose bits. I usually pin the ends of my braids under the braids themselves, and also pin the base of the braids so they don't stick out too much.
10. Optional: spray your whole head with hairspray to help hold the style. Real talk: I'm lazy and skip this step.

And there you have it! In just about 5 minutes you've got yourself a super cute hairstyle!

XOXO
Becca
Follow me on:

Friday, January 31, 2014

DIY Heart Garland

Hi guys! Can you believe it's February tomorrow? Where did January even go??????? Well, with the arrival of February, it's probably due time to start thinking about Valentine's Day, huh. Today I'm here to share a super easy, super adorable DIY heart garland!
To get started, you'll need:

- A selection of cute paper
- A pencil
- Scissors
- A sewing machine that's threaded up and ready to go
Begin by cutting out 2 heart shapes. You'll want a big one and a small one! I had one that was about 2" tall and one that was about 1 1/2" tall. These will be your templates.
Next, trace an even amount of big and small hearts on to the back of your cute paper. You can vary the colors and patterns as much you like. Once they're traced, cut 'em out!
Voila! A lovely array of pretty hearts. Now, the number you need will vary based on how big you'd like your garland to be, but for reference, I had about 20 of each size.
Once you've got your hearts, make your life a little easier by pre-arranging them. I found it easiest to stack them up alternating between the big and little ones and was sure to have the patterns and papers alternate so I wouldn't end up with two in a row.
Now, bring your stack of hearts over to your sewing machine. To start, just run your machine so you can get a chain of stitches a few inches long. Then, start sewing through your hearts. I found it easiest to try to stitch through them just below the top point, and left 3-5 stitches between each heart so it would have nice spacing. If you're lucky, your cat might help you.
Since these can get tangled, I kept a jar next to my sewing machine that I could wind the garland onto as I sewed it. This made it super easy to get everything hung up when I was done!
Once you've sewn through your last heart, keep sewing so you can make another chain of a few inches.
All you have to do now is hang up your garland and admire your handiwork! I created this specifically as a Valentine's Day project, but I love it so much I think I might keep it up year round!

Have you guys been working on any fun Valentine's Day projects?

Til next time!

-Becca
Follow me on:

Thursday, December 19, 2013

DIY Rudolph Silhouette with Marlene of Jade and Fern!

Hi guys! Today, the lovely Marlene of Jade and Fern is back to share an amazing holiday DIY! Marlene's DIY projects totally blow me away, so I was tickled that she wanted to do another guest post. I hope you enjoy her awesome tutorial, and be sure to stop by Jade and Fern for more DIY goodness!
Thank you, Becca, for having me back on your fabulous blog! 

Ever since the deer/antler silhouette trend exploded, I’ve wanted to make a “Rudolph the Red-Nosed Reindeer” version. Mostly because I need more excuses to use glitter. And aren’t the holidays the perfect time to add some sparkly glitter to our nests? 

Bonus: I’ll show you how to make a stencil out of contact paper, which you can apply to any painting project! Here we go:
Materials:
  • a piece of plywood, size is up to you (mine came from the hobby section of the craft store, in a 12”x12” square)
  • contact paper
  • red paint and red glitter
  • a second paint in the color of your choice
  • clear acrylic glaze (such as Mod Podge)
  • brushes
  • scissors
  • pencil
Steps:

Find a reindeer silhouette image that you like, print it on regular computer paper, and cut it out. I ran a Google image search on “deer silhouette” to find the one I used.

Trace the silhouette onto the back of the contact paper. You are creating a stencil, so trace the image flipped opposite of how you want it to look. Since I wanted my reindeer facing to the right, I traced the cut-out facing left

With a pencil, give Rudolph a nose job to emphasize that glowing schnoz. If you are anxious about free-handing a circle (I was!), you can trace a round object, like a toothpaste tube cap.

Cut out the reindeer and apply the contact paper to the plywood. The easiest way to do this is to start with the widest part—the neck—and work your way up bit by bit. Smooth the contact paper down and press down the edges firmly. Press the edges down again. And again. Seriously, do not skimp on this step! The contact paper is acting like painters tape, so you need to create a good seal to get clean lines.

Now paint all the exposed plywood. I used minty green craft paint to tie in to the rest of my holiday décor. You’ll probably need several coats to get smooth coverage.

When the last coat of paint has dried, gently peel off the contact paper. 
Paint that nose red and allow to dry.

Finally, mix red glitter with clear glaze and paint the glitter over the red nose. And that’s it!
I hope you enjoyed this little DIY project! Are you ready for the holidays? (Because, they’re next week—yikes!).

Wednesday, December 18, 2013

DIY Vintage-Inspired Sequined Christmas Ornament!

Hey buddies! I don't know about you guys, but the last few years, I have been a total sucker for tinsel Christmas trees decked out in pretty vintage ornaments. The lovely pastel colors, the sparkle, and all the pretty handmade touches really makes them feel special.

Well, as much as I love them, I've done some combing through the vintage shops and always find the Christmas decorations I love cost an arm and a leg. So! Today, I'm here to share a DIY for a vintage-inspired sequined Christmas ornament!

These puppies are really easy to put together, but admittedly, a litttttttttle bit time consuming to make. But hey, you need something to do while you're curled up on the couch watching Christmas movies, right? Right.

Let's hop to it!
Ok! As usual, you're gonna need some supplies. For each ornament you make you'll need:

- 1 styrofoam ball
- Some fancy ribbon
- Ball head pins (mine looked kind of like little pearls)
- Sequins in the color of your choosing
- Flat head pins. Lots of them. Be sure that the head of the pin is just wider than the hole on your sequins, or you'll be in trouble. With a capitol T!
First things first, begin pinning your fancy ribbon around the circumference of your styrofoam ball using your fancy ball head pins.
Once you're nearing the end, trim your ribbon so you'll have some extra length to make a loop to hang your ornament. Then, loop it, tuck the ends under, and pin into place.
Once you're applied your ribbon, you should have something that looks like the photo above! Hey look! An ornament!
Now, it's time for some sparkle. Have I ever mentioned how much I love sequins before? Because I love them. Adore, is more like it. Actually, let's go with obsessed. I am obsessed with sequins.

Anyway! Start by placing one of your sequins at the middle of one side of your ornament. Then, use a flat head pin to pin it into place.
Then, continue placing and pinning your sequins. I tried to keep mine in a somewhat linear pattern, but I assure you, all hell will break loose as you start going around the curves.
Getting there! Keep going!
And hey, before you know it (ok, fine, after quite a while), you'll have a dreamy ornament like this one!
All that's left to do is to pop it on your tree and admire your handy-work! Seriously, aren't they lovely?

I hope you enjoyed following along and hope this inspires you to try adding a little DIY vintage-inspired ornament to your tree!

Til next time!

-Becca

P.S. Did you enter the Ladyface Blog Holiday Giveaway yet? Tomorrow is the last day to enter!

Follow me on:

Thursday, December 12, 2013

Pretty Paper Snowflakes

Hi guys! Today I'm sharing a tutorial for these pretty 3D paper snowflakes, which happen to be one of my favorite holiday crafts!

Not only are they completely lovely, but they're also incredibly simple to make. The best part is, you can make them in just about any size, so you could make little ones to hang on your Christmas tree, or big ones to hang from the ceiling! They're a lovely, wintery decoration that really pretties up any space you put them in. In fact, I made some to hang in the office at work out of some recycled paper, and they look absolutely lovely.

So! Let's jump into making them!
As usual, it all begins with some supplies!

To make one snowflake you'll need:

- 6 squares of paper in the color and size of your choosing. I made mine 8 1/2"x8 1/2" when I made the large snowflake and 4 1/4"x 4 1/4" when I made the smaller ones.
- Scissors
- Glue dots. Or a glue gun. Or tape and a stapler. I prefer glue dots, but you can choose what works best for you, or what you have most readily available.
- A stapler
- A hole punch
- Pretty string for hanging your snowflakes
1. Fold one of your paper squares in half along the diagonal to form a triangle.
2. Use your scissors to cut lines parallel to the non-folded edges of your triangle. You'll want to cut from the folded edge towards the center point, being sure to stop a little bit before you reach the center. Repeat until you have three lines cut into each side of the triangle. Be sure to space the lines evenly so you'll have a consistent looking snowflake when you're all done.

When you're done, you should have something that looks like the above photo!
3. Next, open up your triangle and bring the center two points up towards each other. Apply your adhesive and bring one point over the other to form a cylinder.
4. Next, turn everything over and bring the next two points up towards each other, apply your adhesive, and form another cylinder. Repeat this, alternating sides, until all the points have been joined.
5. Once you're done, you should have something that looks like this! Repeat steps 1-4 until you have all 6 squares of paper done up like this.

Aren't these pretty just on their own? Love!
6. Next, take three of your pretty shapes and bring their bottom points together. Once you get them evened out, staple the points together.
7. Next, use your stapler to join the edges of your shapes.

Repeat steps 6 and 7 for the other 3 shapes.
8. Now that you've joined your smaller shapes into groups of 3, you should have two pieces. Bring the bottom points together, overlapping them, and staple them together.
9. Then, staple the last two sides together, and you'll be just about done!
Ta-da!!!!!! Isn't that lovely???
10. Now that your pretty snowflake is all made up, you just need to hang it! Punch a hole in one of the points of the snowflake, knot a piece of your pretty string through the hole, and hang away!
Aren't they the prettiest?

I know they seem like they take quite a few steps, but each one of these only takes about 5 minutes to put together. Once you get the first one down, you'll be churning them out faster than you know it!

I hope you enjoyed following along with this tutorial and I hope you get a chance to hang some of these pretties in your home this winter!

Til next time!

-Becca
Follow me on: