Thursday, September 12, 2013

Weekly Wishlist- Indian Summer Edition

Guys, the whole blogosphere is SO excited about fall (myself included, obviously), and amidst all the excitement, a lot of the country has been hit with a heat wave! In fact, yesterday in Seattle we had a record high of 91°F. That's hot for here in the middle of July, let alone in September.

Well, since clearly I'm not going to be busting out any tights or coats for a few more weeks yet, I spent the week drooling over pretty things that really bring the feel of fall, but can be comfortably worn during this hot spell. Come fall, just layer up and you'll be set!
Well, this skirt is obviously perfectly named for this post! I love the drape of this skirt and think the colors are so, so dreamy. It would look great with a t-shirt and some flats on these hotter days, and when it gets cooler you could add boots or booties, tights, and a really cozy sweater to make it a better look for cooler weather. 
I LOVE the feather print on this t-shirt from ModCloth. It would look awesome with jeans for a casual look, or could be dressed up a bit with a fun skirt like the one pictured above. Can you imagine how awesome this would look with a big, cozy infinity scarf layered over it?
The beautiful cranberry color and the suede texture of these flats really says fall to me. They'd be sweet with bare legs and even sweeter with a pair of cozy tights! I love that these shoes can really be paired with dressy or casual looks with a lot of ease.
Speaking of cranberry, how pretty is this dress? I'd actually wear this all summer with some awesome shoes (maybe some Swedish Hasbeens?) and a fun necklace. Come fall, it would look so great with some cognac colored boots, a cozy cardigan, and some printed tights. I'm such a fan of basics like this that you can really make your own.
Polar bears!!!! Do I need to say anymore about this one? Oh ok, I love the look here pictured with sandals and minimal accessories, but man, add a big brown belt, a wrap sweater,  and some tights and it's so perfect for fall.
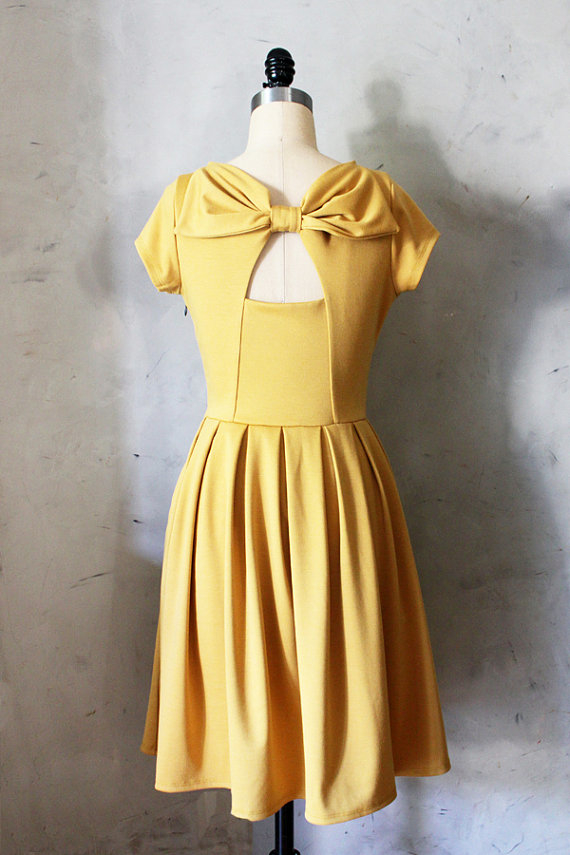
This dress from Fleet Collection is killllllllllling me!!!! How sweet is the bow on the back? I love this pretty mustard yellow because it can really work for you any time of year. In spring and summer you've got a sunny look and in fall and winter, you're picking up the gorgeous tones of the changing leaves. So pretty.
Last but not least, these gorgeous forest green suede flats. Oh man. Like everyone else, I'm crazy about this color right now. These would look so lovely paired with a pretty mustard or cranberry colored dress (hey, maybe one of the ones above?), or could really jazz up an outfit comprised of neutrals.

Well, guys, I hope this post helped inspire you to bring some fall flavor into your wardrobe without overheating on these Indian Summer days.

Are you wishing for anything this week?

Til next time!

-Becca
Follow me on:

Wednesday, September 11, 2013

DIY Honeycomb Stamp

Hey guys! Today I'd love to share a tutorial with you on how to make your own honeycomb stamp!

I always love going to stamp stores and perusing all of their goods. Thing is, I don't do a ton of stamping, so I feel bad blowing $10 on something I'm only going to use a couple of times. I've been dreaming up some fun stamping projects for a while, so I decided to whip up this honeycomb stamp to give them a try!

I particularly like stamps like these where you can place it once, or if you want to make a larger pattern you can place it multiple times, like you can see in the photo above.
To get started, you'll need some materials!

- A cutting mat (or a surface to cut on)
- An X-acto knife
- Tacky Glue, preferably the brush on kind
- A sheet of 1/4" craft foam
- A wood block about the desired size for your stamp
- A hexagon template
- A sewing ruler or metal edged ruler
First things first, trace the shape of your block onto the foam and cut it out using your X-acto knife!
Next, use your hexagon template and your ruler to make your shape! I did this by starting my first hexagon 1/4" in from the edge of the foam, then after drawing the hexagon, I made small marks 1/4" out from the edges so I could place the next hexagon 1/4" away!
Continue the previous step until you've filled up your piece of foam! Then, draw a border 1/4" away from the outer perimeter of the outer-most hexagons.
Use your X-acto knife and ruler to cut out the hexagons, and then cut around the border of the whole piece of foam.
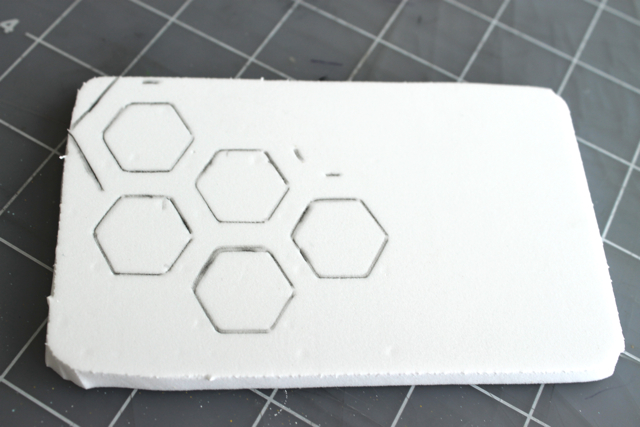
When you're done, you should have something like this! I know it looks a little bit ragged, but that's actually at the back of the foam. So long as the cut lines on the front side of the foam are nice and clean you should have no trouble with the stamping.
Next, apply a thin layer of the Tacky Glue to the back of the foam shape, let it dry for a couple of seconds, then affix the foam to the underside of the wood block and let dry.
Once you're done, you should have something that looks like this!
Once the glue is dry, you can stamp away! Just ink it up and have at it. 

When you're done with your stamping, simply wash the stamp under warm water to remove the ink.

So, it turns out, making your own honeycomb stamp is super easy! Check back next week and I'll show you a fun project I did with it!

Til next time!

-Becca

Follow me on:

Tuesday, September 10, 2013

Chai See What You Did There!

Ok, first things first, sorry about the title of this post. A friend and I were joking around and he was punning it up! It was too good! I just had to. Elana, I know you'll love it!

Anyways, I don't know about you guys, but as soon as fall starts to roll around, all I want are warm, cozy drinks. Since I live in Seattle, I really don't have to walk more than a few blocks to find a good spot to grab a warm drink, but ya'll, those things are expensive!

While I will probably never muster up the ability or courage to make a Pumpkin Spice Latte at home, I can make a mean chai. And guys, it's so easy! And sooooo cheap. And actually really fast, too!

If you are a fan of this dreamy combination of milk, black tea, and warming spices, than you should definitely try this recipe out.
Chai- Makes 2-3 small servings, or 1 very large serving

Ingredients:
- 1/4 tsp ground cinnamon
- 1/16-1/8 tsp ground clove
- 1/16-1/8 tsp ground ginger
- 4 whole cardamom pods
- 2 whole star anise pods
- 4-5 grinds of black pepper
- 2 bags black tea (I used decaf because caffeine and I aren't friends)
- 1 1/2 cups water
- 1 tbsp sugar, or to taste
- 1 cup whole milk (you could also totally use a dairy-free alternative here)
1. In a small pot, combine the water, tea bags, and spices. I usually loop the tea bag strings around the handle of the pot. You could also just remove them.
2. Bring the mixture to a boil, then cover and simmer for 7-10 minutes.
3. Add the milk and sugar to the mixture, mix, and return to a boil. Once boiled, remove from heat.
4. Pour through a fine mesh strainer and serve. You can pour (or ladle) and strain directly into the cup(s) like pictured above, or you can strain the mixture into a larger container. Up to you!
5. Add more sugar if you wanna! I always make my chai on the less sweet side and then add sugar as desired. I like to do it that way particularly if I'm serving it to guests so they can customize the sweetness of their chai to their liking!
After you've served it up, really all that's left to do is enjoy it. I like to serve my chai up with a good book or a crossword puzzle for a leisurely morning lounging around the house. You could also throw it in a to-go cup and bring it with you for a nice walk, which would be especially great on a crisp fall day.

So, as you can see, Chai is super easy! I hope you guys try making your own this fall!

Til next time!

-Becca
Follow me on:

Monday, September 9, 2013

Weekend Wardrobe- Golden!

Top: Forever 21/Similar; Necklace: Er... no idea/Similar; Belt: Anthropologie/Similar; Skirt: Anthropologie/Similar; Flats: J Crew

Well, first things first: I'm a brunette! Yes sir, I dyed my hair on Friday. Guys, I love it so much. The change has been really fun!

The weekend itself was quite nice! I've been off of work on Fridays this summer, so I kicked my weekend off on Thursday night with dinner and drinks. Then on Friday I got my hair done, had tea with a dear friend at the market, and had a belated birthday dinner with another good friend of mine.

Saturday I had an awesome time hanging out with Katie Marie V! We started the day at Buffalo Exchange since she had some clothes to sell, then had some lunch and went thrifting. Katie managed to find two pairs of amazing boots, and I found an awesome fall jacket. It's actually too small, but it has a ton of seam allowance so I'm going to let it out. I'm excited to see how it turns out!

After we finished up thrifting, we went for a walk on the UW campus where these photos were taken. It's a really gorgeous part of town full of lovely, giant old buildings, so it's always fun to check out. Katie went to school at UW so it was fun hearing about her time there. We talked a lot about how neither of us had very traditional college experiences, and also discussed some interesting stuff in regards to the changes we've been noticing in society and the world around us. That Katie is a smart lady, so it was great bending her ear.

Sunday was a day for errands and getting things done. But hey! Those things are important, too.

All in all, I had a fantastic weekend. How about you guys? Did you do anything fun?

Til next time!

-Becca

Follow me on:

Friday, September 6, 2013

(Key) Lime Pie!

Hey guys! Happy Pieday Friday! Today we're talking Key Lime Pie. Ok, technically it's not Key Lime Pie, because I didn't use Key Limes, but ya know what? It's so delicious I can't see how you could possibly care.

This recipe is one of my favorites because it is one of the easiest things in the world to put together. With minimal effort you end up with a sweet, tart, creamy pie filling with a deliciously crunchy graham cracker crust. And let me tell you, it is delightful. What could be better?

Here's how to make it!

(Key)Lime Pie- Makes 1 Pie!
Ingredients:
- 1 pre-baked graham cracker crust (my recipe can be found here)
- 1 14oz can of sweetened condensed milk
- 1/2 cup fresh lime juice (key lime if you're fancy!)
- Zest of 1 lime (about 1 tsp)
- 2 cups of homemade whipped cream (beat 1 cup of heavy cream until soft peaks form, then add 2 tbsp sugar and a splash of vanilla extract, and beat until hard peaks form)
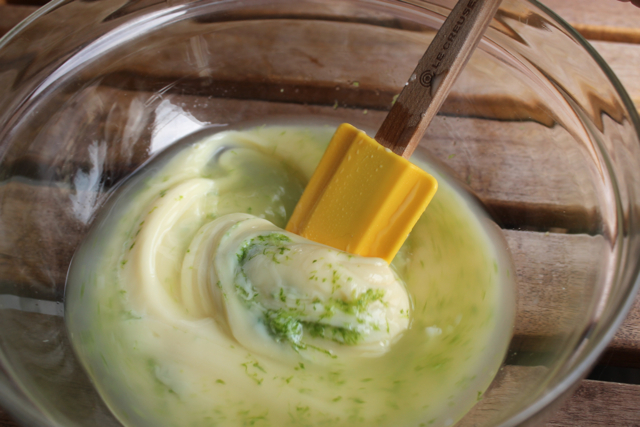
1. Combine the sweetened condensed milk, lime zest, and lime juice. Mix until well combined, then let sit for 5 to 10 minutes until the mixture thickens up.

Just to note, this recipe will not end up a vibrant green. If you are looking for a color that's more than a hint of green, you can feel free to add in 2 drops of green food coloring at this point.
2. Add your whipped cream to the lime mixture and fold it in.
 Keep going...
There ya go! It's done when all there are no white streaks or lumps of whipped cream.
3. Pour the filling into your pie crust and smooth it out with a spatula.
4. Chill your pie in the fridge for 3 to 4 hours, and then serve!
Yum! Now, I know it will be tempting to eat the pie before it chills, and you certainly can, but that chilling time is going to be key (ha!) to actually being able to cut pieces of it. The filling is super soft and gooey (part of its beauty) so that chill time is helpful to firm it up a bit.

I hope you guys enjoyed reading along, and I hope you get a chance to try this recipe out soon!

Til next time!

-Becca
Follow me on: