DIY Honeycomb Stamp
Hey guys! Today I'd love to share a tutorial with you on how to make your own honeycomb stamp!
I always love going to stamp stores and perusing all of their goods. Thing is, I don't do a ton of stamping, so I feel bad blowing $10 on something I'm only going to use a couple of times. I've been dreaming up some fun stamping projects for a while, so I decided to whip up this honeycomb stamp to give them a try!
I particularly like stamps like these where you can place it once, or if you want to make a larger pattern you can place it multiple times, like you can see in the photo above.
To get started, you'll need some materials!
- A cutting mat (or a surface to cut on)
- An X-acto knife
- Tacky Glue, preferably the brush on kind
- A sheet of 1/4" craft foam
- A wood block about the desired size for your stamp
- A hexagon template
- A sewing ruler or metal edged ruler
First things first, trace the shape of your block onto the foam and cut it out using your X-acto knife!
Next, use your hexagon template and your ruler to make your shape! I did this by starting my first hexagon 1/4" in from the edge of the foam, then after drawing the hexagon, I made small marks 1/4" out from the edges so I could place the next hexagon 1/4" away!
Continue the previous step until you've filled up your piece of foam! Then, draw a border 1/4" away from the outer perimeter of the outer-most hexagons.
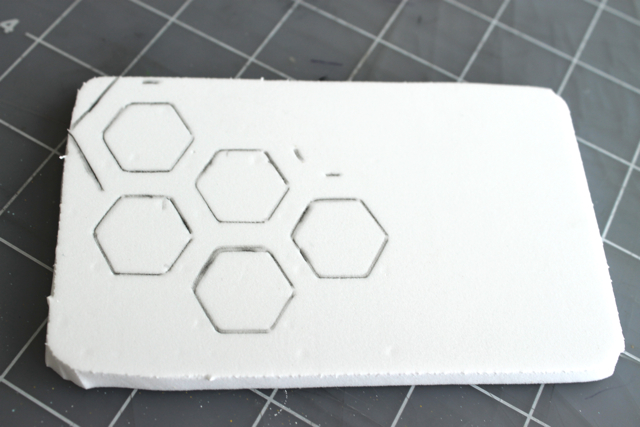
Use your X-acto knife and ruler to cut out the hexagons, and then cut around the border of the whole piece of foam.
When you're done, you should have something like this! I know it looks a little bit ragged, but that's actually at the back of the foam. So long as the cut lines on the front side of the foam are nice and clean you should have no trouble with the stamping.
Next, apply a thin layer of the Tacky Glue to the back of the foam shape, let it dry for a couple of seconds, then affix the foam to the underside of the wood block and let dry.
Once you're done, you should have something that looks like this!
Once the glue is dry, you can stamp away! Just ink it up and have at it.
When you're done with your stamping, simply wash the stamp under warm water to remove the ink.
So, it turns out, making your own honeycomb stamp is super easy! Check back next week and I'll show you a fun project I did with it!
Til next time!
-Becca


I love this stamp! I have always wanted to try a handmade stamp but it seems so time consuming and hard. You made it look so easy. I will have to try this. xx. McKenna Lou
ReplyDeleteThanks, McKenna Lou! It took some trial and error, but if you follow this tutorial you should have a pretty easy time of it!
DeleteI've really been wanting to get into making stamps. My boyfriend and my romantic vacation is coming up, and I've been thinking about making him a custom return address stamp. Seeing this, It doesn't seem all tooooo too difficult! I'll try this project first!
ReplyDeleteElyse @ Cuddly as a Cactus
Oooh, that sounds fun! I think that project would be a bit over my head but I hope it turns out well!
Deleteyour diy's are so inventive and brilliant! love!
ReplyDeletexx
Aw, shucks! Thank you!
Deletelove it! I love stamp making and this one looks great :)
ReplyDeleteI bet you are a pro at stamp making, Juni!
DeleteI thought making your own custom stamps would be really tough! I love that this is simple steps and the possibilities for variation are endless! Awesome DIY ^_^
ReplyDeletethis is such a great idea, I love it! I used to make stamps and yours looks great! :)
ReplyDelete-
Ester @ Drawing Dreaming
Thanks, Ester!
DeleteThis is awesome!
ReplyDeleteThere's something about honey combs that I absolutely LOVE!
Speaking of honey combs, I used your embroidered honey comb tutorial for a skirt that I made, and it turned out so cute! ;)
- i s a @ Head Red + Blondi
Oh I'm so glad to hear it! I would love to see it. If you aren't blogging about it, you should email me a picture!
DeleteI am planning on blogging about it so I'll mention your tutorial, then you'll have to come by and see it ;)
Deleteoh this is super cute Becca!
ReplyDeletexx Alecia with www.likesof.us
This is cool! Very clever idea and so fun to experiment with!
ReplyDeleteSofie x
http://littlegreensofie.blogspot.be/
Love it, you motivate me to try new things cause you make them look easy.
ReplyDeleteAw, that is such a great compliment! Thank you so much!
DeleteOoh... wrapping paper perhaps?
ReplyDeleteYou're on to me!
DeleteGreat DIY! Would be great for making your own wrapping paper! Xx
ReplyDeletehttp://hipslikecinders.blogspot.co.uk/
Ahhhh! You guys are on to me! I'll be posting about wrapping paper next week!
DeleteThis is one of the coolest little things ever, I totally want one
ReplyDeleteThanks, Imogen!
DeleteWoooow! This is awesome!!! The design is really great :)))
ReplyDeletexxx,
Lilla
http://lilycupcake.blogspot.com
Adore adore adore! This is such a great pattern for stamping. I keep wanting to play with making my own stamps--now I have new motivation to do so! Can't wait to see what project you made with it...
ReplyDeleteThanks, Marlene! I hope you try out making a stamp soon! It takes a little getting used to but is super fun!
Deleteoh I just love bees and honeycombs. What a sweet lil DIY.
ReplyDeleteThis is so great! I love the honeycomb design. I've carved stamps but they kinda take forever so I'm going to totally try this method! Thanks for the inspiration!
ReplyDeleteOh, I'm so glad my tutorial could inspire you!
DeleteI love the design !
ReplyDeleteand I am totally gonna make it !!
http://moonshineandsunlight.blogspot.in/
Hi from France, Thanks for this idea... I love it !
ReplyDeleteGreat idea! I totally will make one. And craft foam is easy to cut. Although, I'm wondering if the glue you suggest will work since it is water soluble... And I haven't been able to get this glue to adhere to foam. Any suggestions?
ReplyDeleteYa know, I didn't realize that! I didn't have any trouble with it (even with some mild washing), but if you're worried about it, you could definitely use some super glue or try a hot glue gun!
DeleteThis is such a cute idea! Ever since I've started school I've been writing tons of letters to my friends back home, and I've gotten reallyyyy into stamps!
ReplyDeleteXo, Hannah
sweetsweetnoir.net
So clever and simple. This could be really great for around the holidays!
ReplyDelete-becka
My hexi love fest will include making a hexies stamp now! Thanks
ReplyDelete