


Alright guys, so some of you may know that in the last year or so I've become slightly obsessed with embroidery. I've been collecting (and making!) embroidered art for my hallway, buying more clothing with embroidered details, and have even started making embroidered jewelry.
Today I'm going to show you how to make an embroidered pendant.
In the past, I've made a couple with chevron stripes, but this time I was inspired by my new favorite skirt. Guys, it's gingham and has peacocks embroidered on to it!
We won't be getting thaaaaaat fancy, but here is how you to make an embroidered gingham pendant!
 |
| Embroidered pendant supplies. |
 |
| Trace. |
 |
| Draw in your design. |
Begin by tracing around the middle piece of the 3 piece pendant setting using a pencil to get your work area. After it's traced, you can draw in your pattern. In this case, I drew vertical and horizontal lines 1/8" apart to get a checkerboard pattern.
Put the fabric into your embroidery hoop, tighten it up, and begin! You'll be using a satin stitch for this whole piece, which makes it pretty simple. For the gingham pattern, you'll need a dark colored embroidery floss, a cream or other light color, and then a color in between. I found it easiest to make the dark brown and cream blocks first, alternating between the two line by line, so I could be sure I was getting nice sized squares and was able to keep things even. I recommend doing the squares from top to bottom so you can keep a running stitch.
I was a little nervous that my in between color wasn't a good match, so I decided to do a trial run before I got too far into the project. I was a touch skeptical at this point, but I kept with it anyway!
Once you have all your dark and light squares stitched, stitch all the remaining squares with your in between color. Once you're done with those squares, then the embroidery portion of this project is complete!
At this point, remove the fabric from the frame and cut around the pendant. I usually leave about 1/2" around the edge.


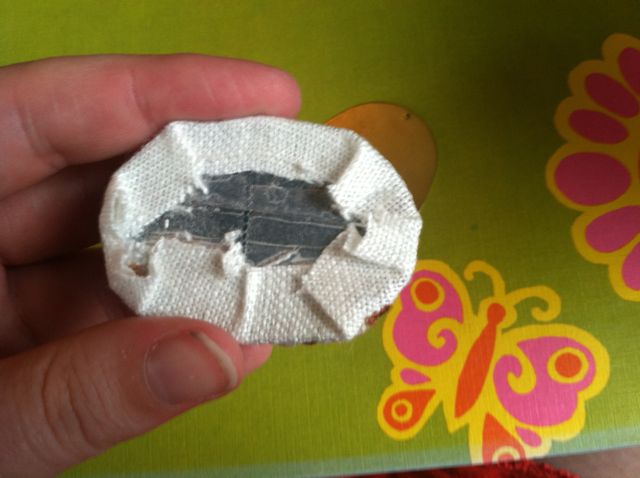
Next, put strips of the double sided tape on the front and back of the middle piece of the 3 piece pendant setting. Center the embroidery on this piece and place in the frame piece of the setting to check that it lines up nicely. If it doesn't, just unstick and adjust! When the placement looks nice, tightly fold the edges to the back of the middle piece of the setting and adhere.

This last bit is the trickiest part. You'll need to sandwich the embroidery/middle piece between the frame part of the pendant and the backing. Since this is an embroidery heavy design there will be a lot of bulk, so I recommend starting at the bottom. When you get the bulk pretty well set in, bend the bottom prong to secure the back. I just use the edge of my snips to bend it in place. Continue around the other sides of the pendant until all the prongs are secured, and the edges of the fabric are well contained.
Don't worry if it's not perfect at the back! People will only be looking at the front where your lovely stitch work is!

See? Look how cute! To totally 100% complete your project, put your pendant on a chain and wear it to your heart's content.
The best part about these pendants is that they are very inexpensive to make once you have the supplies so you can experiment all you like with other designs. You could do some multi-colored french knots, chevron stripes, flowers, or you could even get fancy and embroider your initials. The world is your embroidered oyster!
I'm excited for the next sunny day to come so i can wear my favorite gingham skirt and my new matching pendant.
Til next time!
- Becca!
 |
| First round of squares. |
Put the fabric into your embroidery hoop, tighten it up, and begin! You'll be using a satin stitch for this whole piece, which makes it pretty simple. For the gingham pattern, you'll need a dark colored embroidery floss, a cream or other light color, and then a color in between. I found it easiest to make the dark brown and cream blocks first, alternating between the two line by line, so I could be sure I was getting nice sized squares and was able to keep things even. I recommend doing the squares from top to bottom so you can keep a running stitch.
 |
| Checking colors. |
 |
| Completed with the in between squares. |
 |
| Dark and light squares complete! |
 |
| Cutting to size. |
Next, put strips of the double sided tape on the front and back of the middle piece of the 3 piece pendant setting. Center the embroidery on this piece and place in the frame piece of the setting to check that it lines up nicely. If it doesn't, just unstick and adjust! When the placement looks nice, tightly fold the edges to the back of the middle piece of the setting and adhere.
This last bit is the trickiest part. You'll need to sandwich the embroidery/middle piece between the frame part of the pendant and the backing. Since this is an embroidery heavy design there will be a lot of bulk, so I recommend starting at the bottom. When you get the bulk pretty well set in, bend the bottom prong to secure the back. I just use the edge of my snips to bend it in place. Continue around the other sides of the pendant until all the prongs are secured, and the edges of the fabric are well contained.
Don't worry if it's not perfect at the back! People will only be looking at the front where your lovely stitch work is!
 |
| Pendant complete! |
See? Look how cute! To totally 100% complete your project, put your pendant on a chain and wear it to your heart's content.
The best part about these pendants is that they are very inexpensive to make once you have the supplies so you can experiment all you like with other designs. You could do some multi-colored french knots, chevron stripes, flowers, or you could even get fancy and embroider your initials. The world is your embroidered oyster!
I'm excited for the next sunny day to come so i can wear my favorite gingham skirt and my new matching pendant.
Til next time!
- Becca!
oooh! I love! I want to make one :)
ReplyDeleteWe should have a craft date soon!
DeleteSo so so pretty! No seriously, this would be such a cute stocking stuffer! (No worries that Christmas is only, oh - seven months away..!)
ReplyDeletexo
Lost in the Haze
Thank you! And hey, if you get started now you will be well ahead of the holiday rush!
Delete